- Ryan Rothstein
- From Whitetales
- Hits: 2758
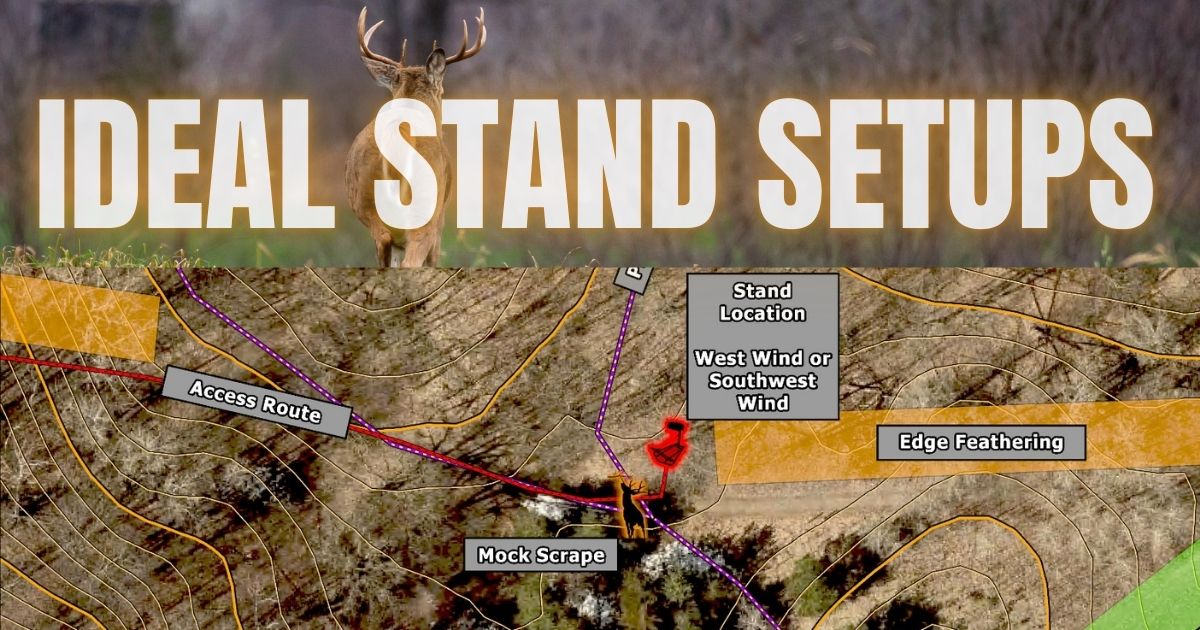
Ideal stand setups – identifying dynamite spots and making them even better
- Ryan Rothstein
- From Whitetales
- Hits: 2758
Most articles I read about stand selection are usually surface-level information. We get it by now—hunt funnels, set up downwind of trails, yada yada. What isn’t discussed nearly enough are the cornerstones and enhancers.
Cornerstones like the perfect tree, precise access route, micro-site factors (the pinch point, trail confluence, or scrape) and macro-site factors (the “why” of what deer are doing), these are what make the difference between seeing a few does and putting an arrow into your target buck.
Enhancers like mock scrapes, edge feathering or brush blockading, planting a few apple trees, and surgically located food plots, these are what stack the odds ever so slightly in your favor for that one single deer you’re after to stroll by during daylight.
Truthfully, surface-level details still matter tremendously. They’re the principles of how deer use wind and terrain to travel. But consistently successful stands recognize the cornerstones and utilize enhancers to define deer travel and reflect an understanding of how and why deer typically move throughout the season.
My hope is that the following real-world stand setups make something click for you on your ground. Similar setups can exist on most properties. The trick is to know the property and understanding where deer are bedding, where they’re feeding, how they get back and forth, and how these change throughout the year. Once you find the spot, sprinkling in enhancers is the cherry on top.
The Headwaters
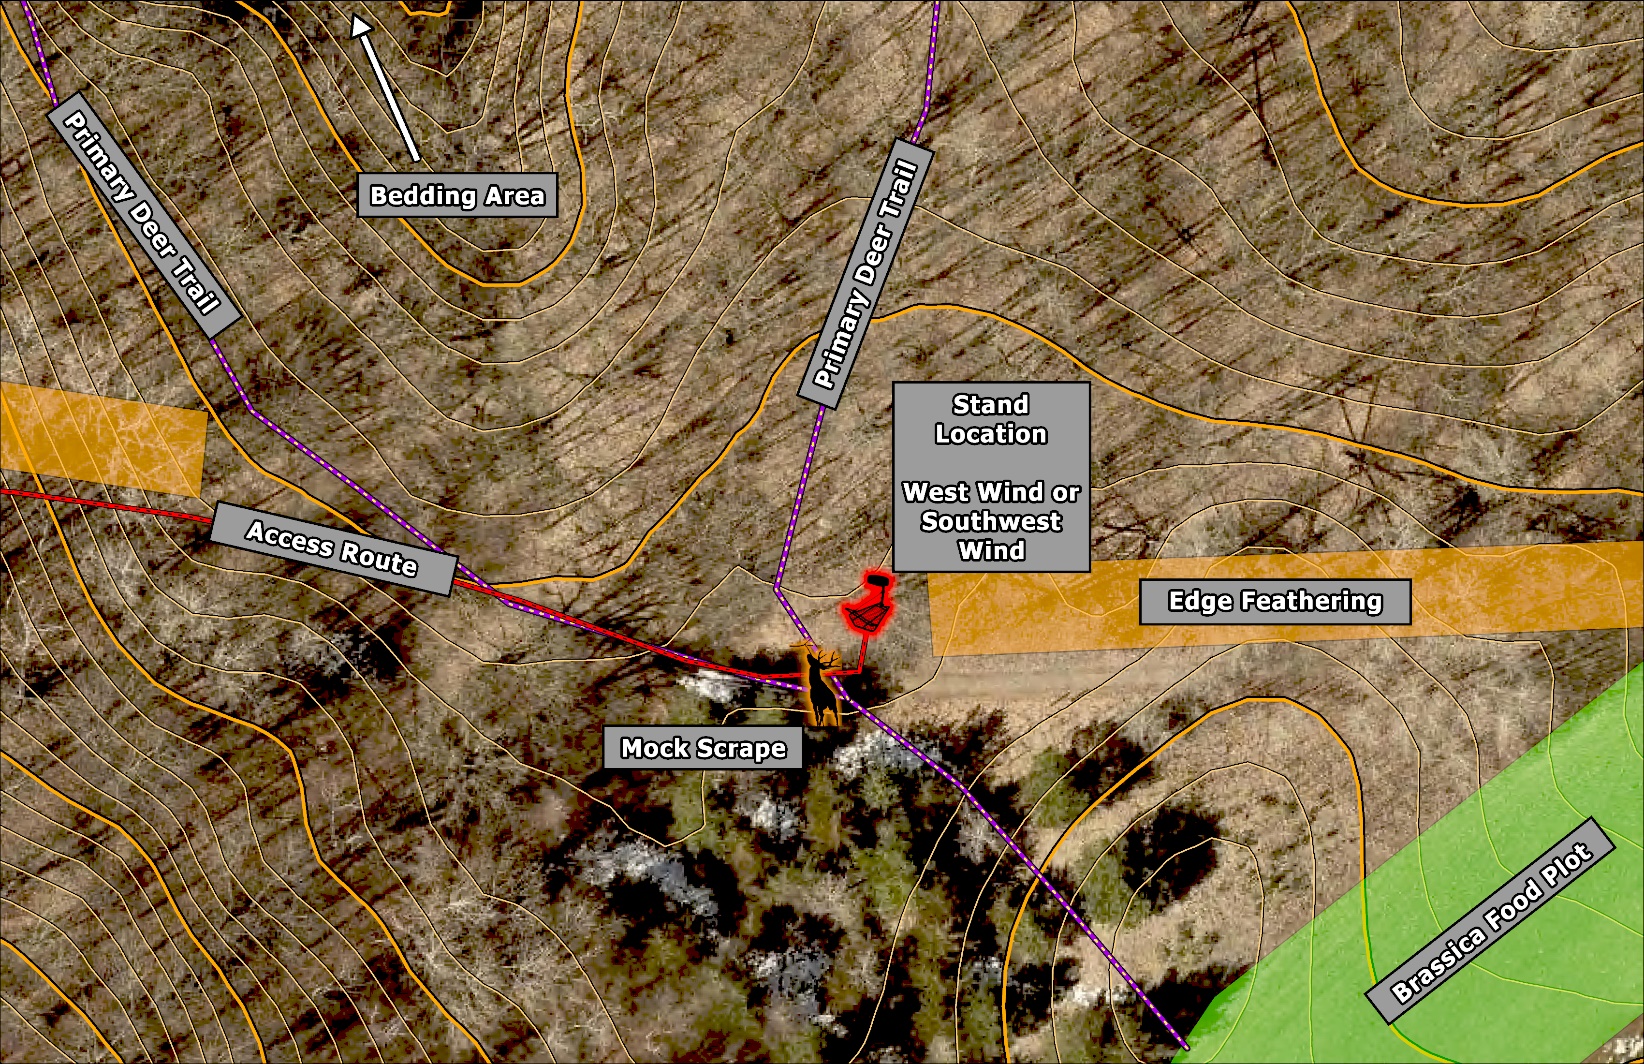
This stand is an all-timer. The headwaters of a small creek begin about 50 yards northwest of the stand and flow north, scouring away the ridges that line each side.
You’ll often hear people from Missouri and Iowa talk about “ditch crossings.” This is the flatland version of that. Though central Minnesota doesn’t have nearly the topography of our neighbors to the south, I have just enough that it forces deer to play the terrain.
I cut my whitetail teeth on this stand, learning lesson after lesson about how deer move and how to work their tendencies into my favor. Primary trails are on the east and west side of the creek, traveling southeast and entering a food plot about 75 yards southeast of the stand. Primary bedding areas are about 300 yards to the northwest.
Access has always been the easy part. An east-west field road runs directly past the stand, a relic of when this property was a working dairy farm. I can slip in silently by walking the field road right to the stand. There’s plenty of cover and elevation between the stand and the food plot, allowing me to slip in early for morning sits and depart easily in the evening after shooting light fades. Bedding is far enough away that I don’t worry about spooking deer.
Over the years, this stand has proven to be a great option from early archery season through the rut, and even into late season depending on the crop in the food plot. Though I have a self-imposed rule of not hunting any stand more than a few times per season, this one would be easy to get away with provided I practiced rigid scent control. I usually have a camera right next to this stand, and I try to let that tell me when I should be moving in.
When I was younger, the spot was an obvious stand location based on deer travel alone. However, back then, numerous deer trails exited the woods on the east side of the creek spread over 100 yards or so. It didn’t take long for me to realize this wasn’t going to work if I didn’t want deer being educated quickly.
The solution was edge feathering. The timber consisted of mature hardwoods, primarily oak, maple, and basswood. It was too easy for deer to stroll out wherever they pleased. This area also has a lot of ironwood and skinny sugar maple in the understory, which made perfect targets for hinge cutting. My goal was simple – make a mess east of the stand and widen out the existing trail west of the stand so that deer would be foolish to not take the easy route.
In a 10-yard-wide strip, I harvested most of the mature aspens for a hundred yards east of my stand. Following the aspen removal, I went back and hinge cut all of the ironwood and many of the skinny maples to create a crisscrossed, jumbled mess of wood. For good measure, I did the same thing on the west side of the west trail for about 100 yards, just to make sure no deer got any hare-brained ideas.
It worked like a charm. Now, these two trails form a confluence about 10 yards from the stand, and it’s a slam dunk shot. I even have the stand set up so I can take the shot sitting down, further minimizing movement prior to the shot.
Recently, I’ve focused on turning the confluence of these trails on the old field road into a massive communication hub for the deer. In late July, I’ll go out and make about half a dozen large mock scrapes within this 300-yard area to incentivize deer travel. Considering these are right on the road, I can easily refresh them weekly throughout the season with nothing more than a small garden rake and whatever combination of dominant buck urine, preorbital gland lure, and estrous doe urine I choose.
I have a real soft spot for this stand, and it just keeps getting better with time.
The Ridge Saddle
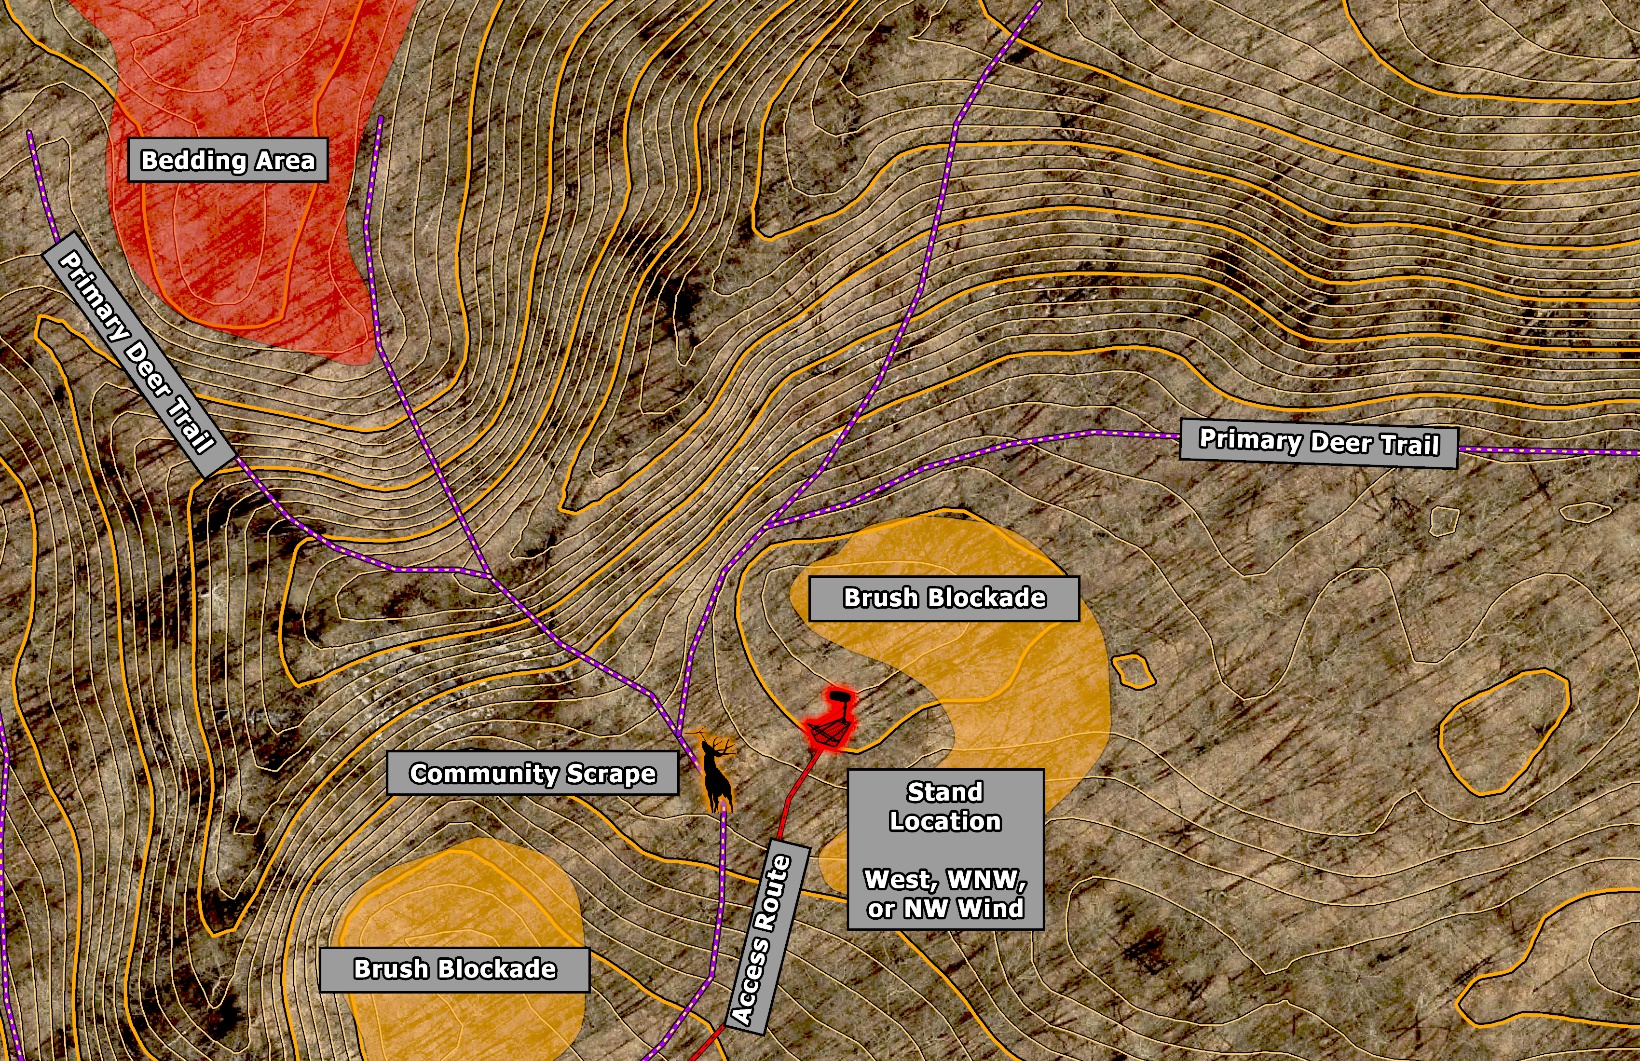
This is another classic setup that has stood the test of time across the whitetail’s range. Two ridge systems come together, with most of the bedding occurring across the creek atop the south-facing slope. On the south ridge, there’s an obvious saddle between two high spots, and it’s a travel magnet every year.
Though I identified this as a prime stand site when I was much younger, it took me a long time to dial it in. Truth be told, I still make tweaks, as I think I could do more to foolproof the stand from getting busted.
When I first hung this stand, I knew immediately this was a high-risk setup. Deer would come from the north, cross the creek, and as soon as they would hit the saddle, they would fan out in all directions. This resulted in me getting busted far more often than I can tolerate, so I knew something had to change.
In this case, I created wide brush blockades, both east of the stand to prevent deer from going downwind of me, and farther west of me to encourage deer to stay on the primary trail and in bow range. I started by dragging in as much brush as I could and piling it to discourage deer travel. I then hinge cut all the ironwood and many skinny maples to create a wide swath that was virtually impenetrable.
This setup is a classic rut stand. There’s always a huge community scrape about 20 yards from the stand where the trails conjoin on the saddle, and bucks love cruising this ridge curve trying to sniff out estrous does across the valley.
I only hunt this stand during the rut and when conditions are ideal. Despite efforts to minimize my impact, the reality is that it’s still a high impact stand, and it’s not worth educating deer by hunting here other times of the year unless the camera on the scrape is showing substantial daylight buck activity.
I access this stand by essentially following the primary deer trail in from the south but staying 10 yards on the downwind side of the trail. This seems to keep deer relatively unaware that I’m intruding so far into the woods. I’ll usually hunt this stand a couple times per year at most. The activity here is fantastic, but that’s because I’m not constantly hunting it and blowing the area out.
The Eagle’s Nest
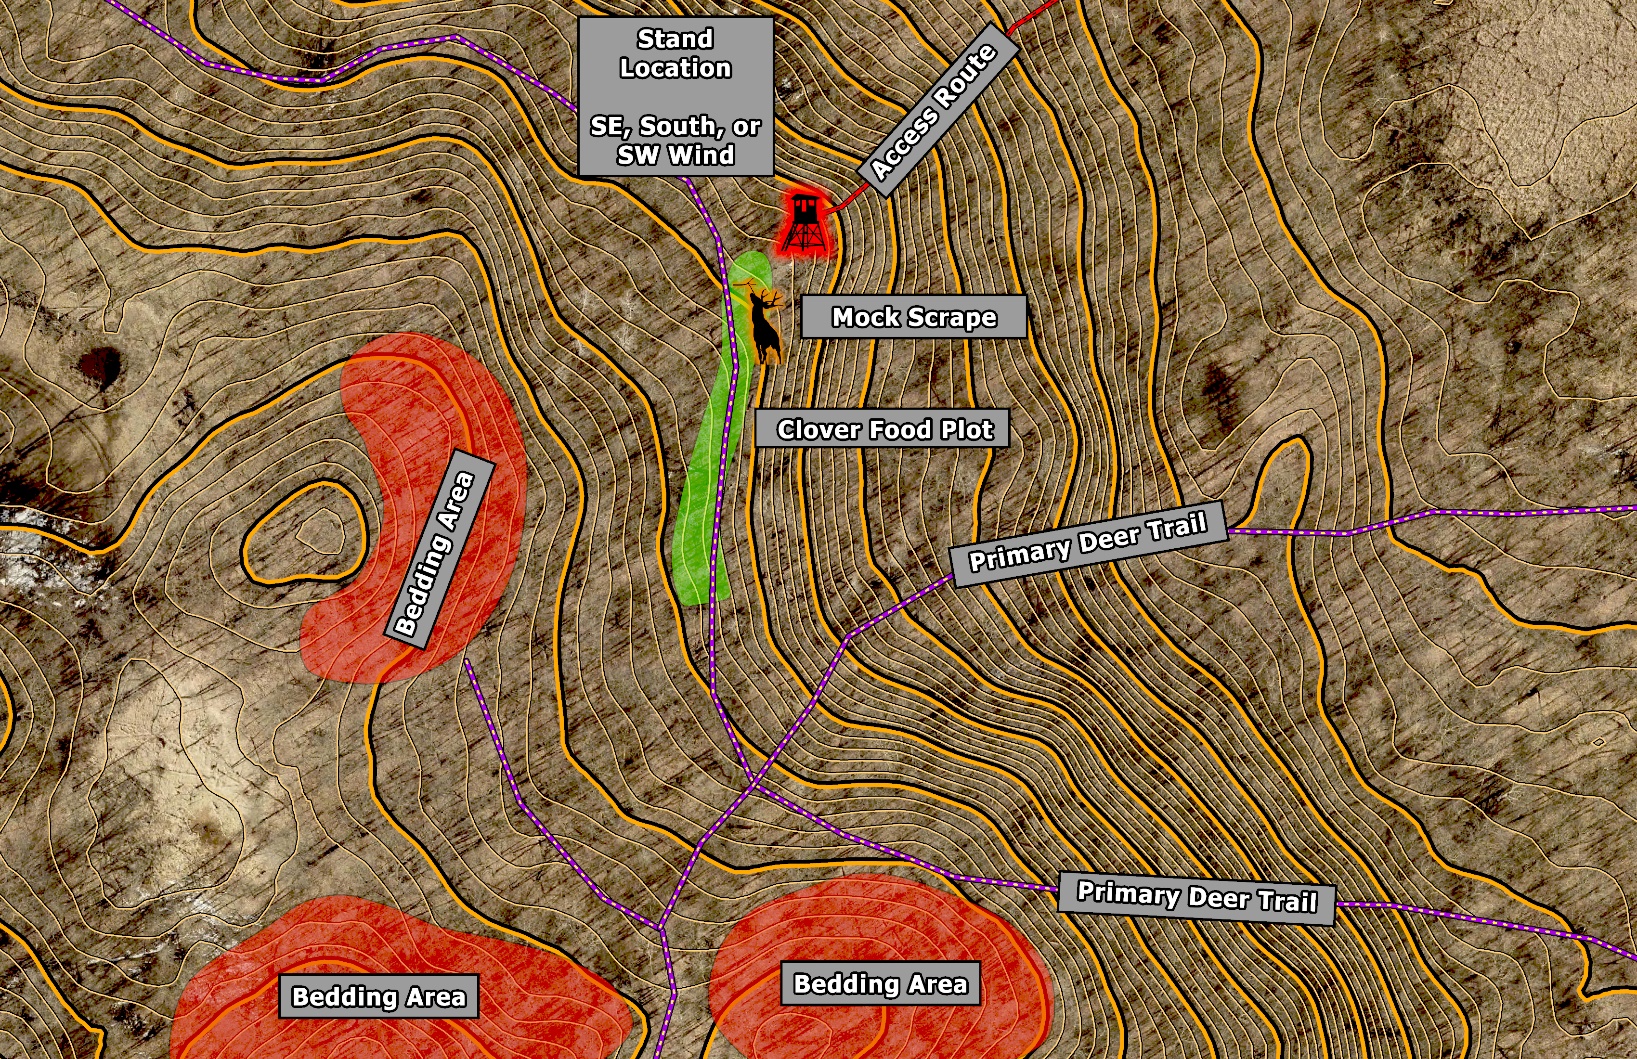
This setup is flat-out cool to me. It’s in a big block of mature hardwoods that has a lot of cool topography going on. When you’re up in the stand, it feels like you can see for a mile, which is how it got nicknamed “The Eagle’s Nest.”
The way the ridges turn, there are three distinctive bedding areas south of the stand, with deer generally shifting their exact bedding location based on wind direction. Numerous trails crisscross about 100–130 yards south of the stand, many of them related to the bedding that exists on these ridges.
Last year, I installed a small clover food plot on a tiny bench tucked into the ridge that runs maybe 70 yards north to south. This was an area deer traveled through loosely, and the food plot focuses that movement. I also installed a pair of mock scrapes about 20 yards from the stand to further incentivize deer traffic close by.
This stand is designed for firearms season and the rut. With our firearms season overlapping some of the heaviest rutting activity, this stand is tailor-made to take advantage.
The real brilliance of this stand is that it feels every bit like a deep-woods setup – and yet, it’s only 100 yards into the woods. I can easily access this stand from the northeast (unfortunately by climbing straight up the ridge), and my impact in doing so is negligible. Any deer in the bedding areas should be unaware of me slipping in or out.
Though the stand is intended for gun season, this could easily double as an early season or pre-rut bow stand if trail cameras dictate. I have a camera both on the mock scrapes and on the trail confluence to the south, and if a buck is giving me a reason to go after him, I’ll give it a shot.
Final Thoughts
I firmly believe there’s more than one right answer to most of this deer hunting stuff. Though I’m always searching for perfection, I’m not naïve enough to think these are “perfect” stand sites. Personally, I think they’re pretty good and they’ve provided some great encounters over the years, but I’m always evaluating them and scratching my head about what I could do differently to increase my odds.
Ultimately, it comes down to understanding deer behavior and travel tendencies. Once you understand how deer are utilizing and traveling through your hunting area, find the spots that concentrate deer movement, or provide you an opportunity to slip into a high-traffic area with minimal intrusion.
When you have these spots identified, get your stand in place, and then start utilizing enhancers that’ll put that stand over the top. I can’t say enough good things about using edge feathering or brush blockades to keep deer from getting downwind of your setup. Mock scrapes can be your best friend if you’re meticulous about scent control.
Finally, don’t be afraid to experiment and find out what works for you wherever you’re at. Get creative and see what works best for your particular situation. It doesn’t have to work every time. It just needs to tilt the odds ever so slightly in your favor. That’s the name of the game when it comes to tagging mature whitetails.